Prelude
If you miss the beginning of my series, here’s my article about how to build an e-learning platform on AWS. Otherwise, if you are following this serie, the last time we build our backend to safely produce and store our HLS contents (if you miss it, follow the link). If you want to provide premium content you have put in place a solution to ensuring secure and efficient distribution of premium content to end-users. AWS CloudFront, coupled with signed cookies, provides a robust solution for precisely this purpose. This article will delve into the mechanisms of leveraging AWS CloudFront and signed cookies to deliver premium content seamlessly.
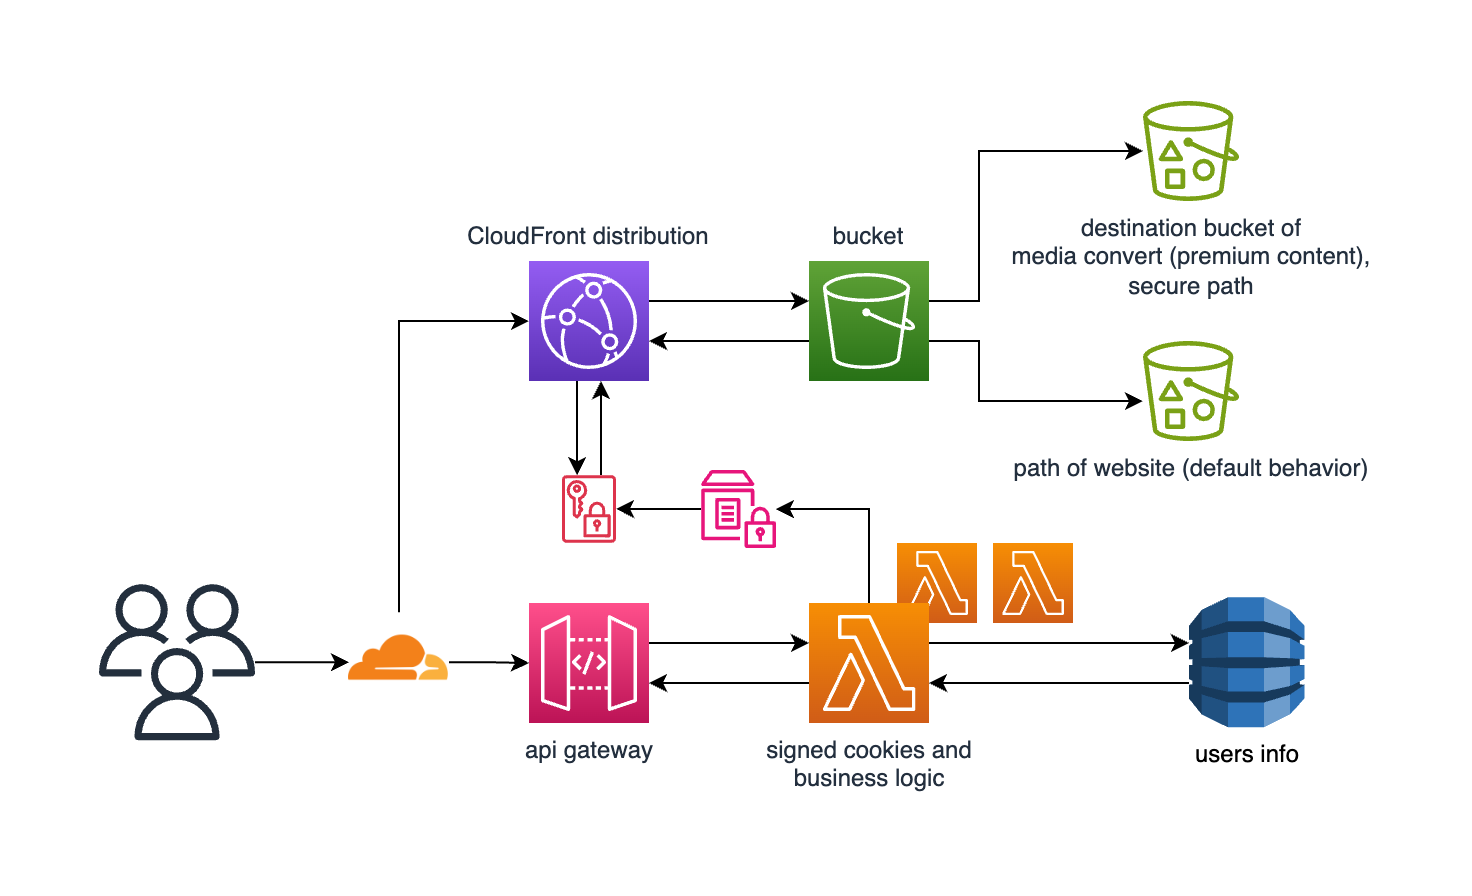
Above you can find a general schema about an architecture like this can work. We are not going to go through all the steps - DynamoDB and Business Logic is something you can decide by yourself. We are going to show instead the core part of this reasoning, meaning… everything else! Enjoy the reading!
Introduction to AWS CloudFront and Signed Cookies
AWS CloudFront is a content delivery network (CDN) service provided by Amazon Web Services. It accelerates the delivery of web content to users across the globe by caching content at edge locations closest to the end-users. CloudFront supports various content types, including static and dynamic content, live and on-demand streaming media, and custom APIs.
Signed cookies are a method of providing controlled access to content served through CloudFront. By attaching signed cookies to requests, you can enforce access policies and restrictions on who can access your content, for how long, and under what conditions.
Setting up CloudFront Keys with AWS CDK
While I was using Amplify for my original project, I actually created a custom resource (see doc). AWS CDK is an infrastructure as code (IaC) tool that allows developers to define cloud infrastructure using familiar programming languages such as Python, TypeScript, and Java. Let’s walk through the process of setting up CloudFront keys using CDK in Python.
Premise
amplify add custom? How do you want to define this custom resource? … (Use arrow keys or type to filter)
❯ AWS CDK
AWS CloudFormationAfter that, you can create a distribution using the sample above.
from aws_cdk import core
from aws_cdk import aws_cloudfront as cloudfront
from aws_cdk import aws_iam as iam


class MyStack(core.Stack):

    def __init__(self, scope: core.Construct, construct_id: str, **kwargs) -> None:
        super().__init__(scope, construct_id, **kwargs)

        # Define your bucket name and path for signed cookies
        bucket_name = "your-bucket-name"
        path = "/secure-path/"
        prefix = "secure-content/"

        # Create an origin for the CloudFront distribution
        origin = cloudfront.OriginProperty(
            domain_name=bucket_name,
            http_port=80,
            https_port=443,
        )

        # Create a signer for signed cookies
        signer = cloudfront.SignerProperty(
            default_ttl=3600,  # Default expiration time for cookies in seconds
            private_key="YOUR_PRIVATE_KEY",  # Replace with your private key PEM data
            algorithm=cloudfront.CloudFrontAlgorithms.RSA_SHA1
        )

        # Create a behavior for public content
        public_behavior = cloudfront.Behavior(
            paths=["/*"],
            origin=origin
        )

        # Create a behavior for signed cookie protected content
        signed_cookie_behavior = cloudfront.Behavior(
            paths=[path],
            origin=origin,
            cache_policy=cloudfront.CachePolicy.CACHING_DISABLED,
            signed_cookies=cloudfront.SignedCookiesProperty(
                enabled=True,
                cookies=[
                    cloudfront.CookieProperty(
                        cookie_name="MySecureCookie",
                        policy="private",
                        content_signing_algorithms=[signer]
                    )
                ],
                key_pairs=[
                    cloudfront.KeyPairProperty(
                        id="YOUR_KEY_PAIR_ID",  # Replace with your Key Pair ID
                        headers=["*"]
                    )
                ]
            ),
            grant_read=iam.Grantable(
                "arn:aws:iam::cloudfront:user/CloudFront <ID_OF_SERVICE_ACCOUNT>"
            )
        )

        # Create the CloudFront distribution
        distribution = cloudfront.Distribution(
            self, "MyDistribution",
            default_behavior=public_behavior,
            behaviors=[signed_cookie_behavior],
            origin_configs=[cloudfront.OriginConfig(
                origin=origin,
                behaviors=[public_behavior, signed_cookie_behavior]
            )]
        )

        # Print the CloudFront distribution domain name
        print(f"CloudFront distribution domain name: {distribution.domain_name}")


app = core.App()
MyStack(app, "MyCloudFrontStack")
app.synth()
In this code snippet we define a new CloudFront distribution with an S3 bucket as its origin: this bucket is going to be the bucket used as destination of the AWS Media Convert destination. We generate a CloudFront key pair for signed cookies from an asymmetric private key. We associate the key pair with the distribution and specify a policy name and cookie name for the signed cookies (ensure you replace “my-bucket.s3.amazonaws.com” with your actual S3 bucket name and adjust policy and cookie names as needed). Of course, you must replace YOUR_PRIVATE_KEY with your actual private key PEM data in base64 format, the YOUR_KEY_PAIR_ID with the ID of your Key Pair created in the CloudFront console for signing cookies. You can then adjust the TTL value and other parameters in the SignerProperty and CookieProperty based on your specific needs.
Different behaviors
- Public behavior: delivers content from the specified bucket for all paths except the secure path;
- Signed cookie behavior: delivers content from the specified bucket with the secure prefix only to users who have a valid signed cookie. This is going to guarantee that only auth user (and/or premium) ones can access your premium content!
Setting up an AWS API using Amplify for Delivering Signed Cookies
Let’s see how we can set up an AWS API using Amplify to deliver signed cookies to authenticated users.
Prerequisites
If you already read the second episode of this Amplify serie, you can skip to the next section, otherwise go through the following steps. First make sure you have the AWS Amplify CLI installed on your machine. You can install it via npm by running:
npm install -g @aws-amplify/cli
amplify init
Follow the prompts to configure your Amplify project.
Add an API to your Amplify project:
amplify add apiFollow the prompts to configure your API, specifying the appropriate authorization type (e.g., Amazon Cognito user pools, as shown in my previous article too).
Set up Signed Cookies
Once your API is configured, you can configure signed cookies in API Gateway to be delivered to authenticated users. If you miss how, you can have a look here about how you can leverage Amplify CLI to provide authentication to a given endpoint. Thus, providing secure signed cookies consists in no more than adding a Lambda Function secured by authorizer (handled by Amplify)
import os
import json
import time
import base64
import boto3
from botocore.exceptions import ClientError
from cryptography.hazmat.backends import default_backend
from cryptography.hazmat.primitives import hashes, serialization
from cryptography.hazmat.primitives.asymmetric import padding
from datetime import datetime

def get_secret():
    session = boto3.Session(region_name="eu-west-1")
    ssm = session.client("ssm")
    cloudfront_private_key = os.environ.get("CLOUDFRONT_PRIVATE_KEY")
    private_key = ssm.get_parameter(Name=cloudfront_private_key, WithDecryption=True)
    return private_key["Parameter"]["Value"].encode("utf-8")

def rsa_signer(message, key):
    # Deserialize a private key from PEM encoded data to the asymmetric private key types.
    private_key = serialization.load_pem_private_key(
        key, password=None, backend=default_backend()
    )
    # Return an AsymmetricSignatureContext used for signing data.
    return private_key.sign(message, padding.PKCS1v15(), hashes.SHA1())

def handler(event, context):
    try:
        # Expiration date
        expiration = int(time.time()) + int(os.environ["DURATION"])
        private_key = get_secret()
        # Policy statement
        statement = (
            '{"Statement":[{"Resource":"'
            + os.environ["RESOURCE_PATH"]
            + '","Condition":{"IpAddress":{"AWS:SourceIp": "'
            + os.environ["IP_ADDRESS"]
            + '"},"DateLessThan":{"AWS:EpochTime":'
            + str(expiration)
            + "}}}]}"
        )
        # Encode base64 encode and replace invalid characters
        encoded_statement = (
            base64.b64encode(statement.encode("utf-8"))
            .decode()
            .translate(str.maketrans({"+": "-", "=": "_", "/": "~"}))
        )
        # Hash object
        encoded_signature = (
            base64.b64encode(rsa_signer(statement.encode("utf-8"), private_key))
            .decode()
            .translate(str.maketrans({"+": "-", "=": "_", "/": "~"}))
        )
    except Exception as e:
        print(str(e))
        return {
            "statusCode": 500,
            "headers": {"Access-Control-Allow-Origin": "*"},
            "body": str(e),
        }
    else:
        return {
            "statusCode": 200,
            "headers": {"Access-Control-Allow-Origin": "*"},
            "body": json.dumps(
                {
                    "CloudFront-Policy": encoded_statement,
                    "CloudFront-Signature": encoded_signature,
                    "CloudFront-Key-Pair-Id": os.environ["ACCESS_KEY"],
                    "Domain": os.environ["DOMAIN"],
                }
            ),
        }
The function is designed to generate signed CloudFront URLs based on a policy statement.
get_secret: retrieves the CloudFront private key from AWS Systems Manager Parameter Store (SSM) using Boto3. The private key is encrypted, soWithDecryption=Trueis used to decrypt it;rsa_signer: signs a message using RSA encryption with SHA1 hashing. It uses the private key loaded from the PEM-encoded key provided as input.handler: this is the main entry point for the Lambda function. It calculates the expiration timestamp for the policy statement based on the current time and a duration specified in the environment variables. Then it retrieves theCloudFrontprivate key using theget_secretfunction. Constructs a CloudFront policy statement as aJSONstring based on environment variables likeRESOURCE_PATH,IP_ADDRESS, etc: it encodes the policy statement and generates a signature using RSA encryption.
On the frontend side
If you need an example about how you can serve content in the frontend, in my Vue application I did something like this (take this as an example):
// this method is triggered every time a video is clicked in my navbar
async changeRef(item: any) {
    await getCookie().then((response) => {
        let policy = response['CloudFront-Policy'];
        let signature = response['CloudFront-Signature'];
        let keypairid = response['CloudFront-Key-Pair-Id'];
        this.cookies.set("CloudFront-Policy", policy, 3600, "/", "YOUR_HOST_NAME", true);
        this.cookies.set("CloudFront-Signature", signature, 3600, "/", "YOUR_HOST_NAME", true);
        this.cookies.set("CloudFront-Key-Pair-Id", keypairid, 3600, "/", "YOUR_HOST_NAME", true);
        this.source = `https://YOUR_HOST_NAME/${item.source}`;
        console.log(`signed url for ${item.source}`, this.source);
    }).catch((error) => {
        console.log(error)
    })
},
I have a dedicated component to serve HLS ready streamed video pretty much similar to this one: cookies are set and the spread by video-js automatically.
<template>
    <video-player :src="source" controls :loop="true" :volume="0.6" :options="options" ref="video-player" />
</template>

<script lang="ts">
import { defineComponent } from 'vue'
import 'video.js/dist/video-js.css'
import { VideoPlayer } from '@videojs-player/vue'

export default defineComponent({
    name: 'VideoPlayerPlatops',
    components: {
        VideoPlayer
    },
    data() {
        return {
            options: {
                autoplay: true,
                controls: true,
                sources: [
                    {
                        src: this.$props.source,
                        type: 'application/x-mpegURL',
                        withCredentials: true
                    }
                ]
            }
        }
    },
    props: {
        source: {
            type: String,
            required: true
        }
    },
})
</script>
Tada! If you then try to stream content being not authenticated - whatever the way, meaning, without signed cookies - you will get a 403 as unauthorized.
Conclusion
In this article, we explored how to leverage AWS CloudFront and signed cookies for delivering premium content to end-users securely. We walked through the process of setting up CloudFront keys using AWS CDK in Python and configuring an AWS API using Amplify to deliver signed cookies to authenticated users.
By implementing these techniques, you can ensure that your premium content is delivered efficiently and securely to authorized users, enhancing user experience and protecting your content from unauthorized access. If you miss the previous article, about the HLS production, you can find it here.
For more information on AWS CloudFront, signed cookies, AWS CDK, and AWS Amplify, refer to the official AWS documentation and resources. Happy coding and if you feel ready, go to the next episode!